Showing posts with label tutorial. Show all posts

Solve the hang problem of your computer


  • At first go “run” from start menu.
  • Type regedit & press enter.
  • Double click on Hkey_Current_User
  • Double click on Control panel.
  • Double click on Desktop.
  • Now double click on auto end task from right side.
  • Put the value data 1 instead of 0 and click on OK. Now restart your computer.

Now, your Pc won’t hang ever...Stay cool!!

VidShot capturer: a new dimension for snapshot


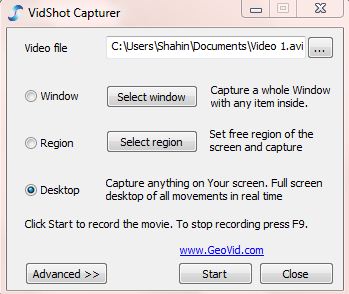
Now it became very easy taking screen shot of desktop, windows or any custom area snapshot with a small software named VidShot capturer. It’s also very easy to use.
1st step:
At first open the VidShot capturer. 
2nd step:
Now select the file name and the folder where you are going to save it.
3rd step:
Here you will get three options for capturing video. Select region to capture anything from your selected area. Now click on Start button.
4th step:
Press F9 to cancel the capture or make double click on video soft icon on Taskbar.
5th step:
Press “yes if you want to make a preview of your caption.

How to create and verify a Payza account


How to create a Payza account:

  • At first click here to Sign-up.
  • Click on Sign-up now.
  • Select "Personal Pro".
Step-1:
Fill up the form properly. Provide the information as given on your national ID card. And then click on Next Step at the bottom of the form.
Step-2:
Select the options- Email address, Password, Transaction Pin and Security Question .Answer them correctly. Now click on-final step.
Step-3:
Log-in to your E-mail to make this account valid.

How to verify your Payza account:

There are two ways to verify your account.
  • Document validation process.
  • Photo ID validation process.
I am going to describe here both the process and what you are going to need for completing each process.

Document validation process:

Needed documents:
  • A scan copy of your national ID card or passport or driving license.
  • You monthly bank statement.
Process:
  • Log-in to your Payza account.
  • Click on "Verification" on the right top of the page.
  • Select- "Document validation".
  • Click on "Choose file". Select the documents (scan copies) mentioned above.
  • There is a Bank Document option right below. Put a tick mark on "Bank statement" underneath of "Bank document" option. Select your account statement (scan copy).
  • Are you done?  You can make a preview at your provided documents as a final touch. Then click on "send" button to send your request.

Photo ID validation process:

Needed documents:
  • Your national ID card along with your passport or driving license. In this process you won’t need to provide your bank account statement.
Process:
  • Go to verification.
  • Select- "Photo ID validation".
  • Select your National ID, passport or driving license copy(scan copy) from photo ID.
  • Press on "Next".
  • Make a preview at your documents.
  • Finally click on "send" button to send your request.
You will get their reply within 2-3 days. There is no reason not to approve you if your provided documents reached them properly. But if they don’t accept your request, they will specify you the reason.

Use free internet with Banglalion or Qubee


Hey friends...How are you all? Again we come with a new tricks of hacking Banglalion/Qubee as we got a lot of response from you guys for this stuff. Here is the whole process for you.
  • At first, open an account on following site.
-->
  • Now go to your E-mail to verify this ID.
  • Then, download a software from here-
  • Open it by winrar or 7zip. You will find a drive there. If you use 32-Bit OS, open the file-x86. Or, if you have 64-Bit OS, then open the file-x64.
  • Wait for a while. Following window will appear there.
  • Click on any key.
  • Now open the software I provided. A pop-up window will appear like following one.

  • At this stage, connect your modem. Open PD-launcher and provide your username and password. Click on connect. It will take maximum one minute. We are done!
Now use internet for free! You will be able to use 100MB by one ID. So open a number of ID as much as you want. But for using various ID, never finish 100MB completely from any ID. So whenever you are about to finish the MB by one ID, connect with another one. By this way, you can browse, download and whatever you wish! Take care!
Photo source: www.techtunes.com.bd

Lock your drive/pendrive without any software


Hello friends… many of us have to lock our folder for various purposes. For this, we use Universal shield, folder lock, folder guard etc many software. Moreover, we take help from various drive protector software to lock any drive. However, today, I am going to show you how to give password protection to any drive or pendrive even without any software. But you can apply this trick only on windows vista and windows seven. I am showing that, how to apply password on windows seven:


  • Connect your penvrive. ( in case of giving password on pendrive)
  • Right click on that drive, in which drive you want to give password. Then select the option, turn on bitlocker like the following figure.


  • After selecting the bitlocker, you will see like the following image.
  • Now follow the procedures, what is shown in the following figures.


  • Then the following figure will appear.
  • After the encryption is complete, the following figure will appear. Click on close button.
  • Your drive/pendrive is locked now. Whenever you want to connect to your locked drive, you will see a page like the following figure.
You would have to give password on that box. Otherwise, it will fail to unlock.
Photo source: http://www.pchelplinebd.com/

Now Attach files to E-mail as many as you wish


Have you ever faced any problem to attach a large file with an E-mail? Here is the solution for this problem! You can use “Winmend file splitter” 
Try it by yourself and suggest your friends too!
  • At first determine the file which you want to split over, select button source file. Later it needs to select an output folder.
  • You can increase the block numbers freely. After that, only click on split button.
  • Later go to Out folder to attach the split files with the E-mail.

Super hacking tricks of Banglalion postpaid


Today I came here with a super hack tricks of Banglalion. Try this thing for unlimited free downloading. But sadly, there is no scope for free browsing. It will rather consume your bandwidth. So, let’s start it!
Now connect your internet as you always do and download anything you want. It won’t consume your bandwidth.

N.B- 

  • This tricks is only applicable for Windows XP. It won’t work in vista or Windows 7.
  • Only postpaid users of Banglalion will be able to do it. I will try to find another way for pre-paid users soon.

How to apply for Google adsense


Once it was easy to get approval of Google adsense. But now it becomes a big challenge for the bloggers. If you want to apply for it from blogspot then at first sign in to your blog. 
Click on Go to post list icon.
 Select Earning option from there.
Click on Switch  Adsense Account.
Click on Create account from Create a new Adsense Account tab.
Select  your Account type as “Individual” and your Country or territory as “Bangladesh” from Create an adsense account.
Then provide you contact informations. Put your name on Payee name. This must match with your bank account. If you don’t have any bank account right now then give you real name & address there. And open an bank account later using this name. Google will send a letter to your address to verify. Finally give your mobile number and put tick mark on every policy options. After that click on Submit Information.

You can edit all of your information before you continue. For doing that, click on Edit Account Information otherwise click on continue. You will get a message within 2 or 3 days & a confirmation E-mail within 1 month including every terms and conditions. Agree to submit it. That’s all.

How to Save your mobile Dropped in Water


After the hell summer we all are loving this rainy season. Who doesn’t love getting wet in the rain!  But be careful about your mobile! If it gets wet too then there might arise some problems. Well, here I am giving some solutions if you ever have this trouble. Hope these will help you.
  • If your  mobile gets wet or drops into water  take it out from there as quickly as possible. And most importantly don’t panic. Hold the phone swiftly. Do not turn it on, because it can cause of short circuit.
  • Remove the battery at first from the mobile.
  • Remove the SIM card from the mobile to save it first as it’s more important than the mobile for many of us.
  • Remove covers, holdings and all the external connectors as much as possible.
  • Dry your phone as much as possible. Even one drop of water can ruin your phone . So, do it with utmost care and in a gentle way. Don’t move it excessively.
  • If it’s possible to use a vacuum cleaner that would be best for you now. It will suck the water from the inner part also but don’t bother to use hair dryer instead of that even in cold mode. It will rather worse for the phone.
  • Use uncooked rice to dry it up. Put it in a bowl of uncooked rice for a whole night. It will help to absorb the remaining water in the inner part.
And after that, pat it with a tissue paper or towel. Now wait for 24 hours and then test it. If it doesn't turn on at all then try to plug it into it’s charger without it’s battery. If it works properly then all you have to do is to buy a new battery. but if it doesn't then go to the service center. I think now it’s time to pay them to save your mobile!

Thank you all!


Website development with JOOMLA: part 5


Hello friends… thank you for staying with us from the first part. Those who missed our last any part, can check out from flowing-
At first, open your browse and type localhost/technotoons/administrator on the address bar. Press enter, then you will be asked for a username and password. Your username is admin, and password is 123456. Login to the control panel of your website. Click on Extension>install/uninstall from the drop down menu. Just like the following figure-
By clicking on it, you will see the following figure
Browse your template by clicking on the marked option of the above image. Then click on uplpad and install.
Within a few moments, your template will be installed and you will get a success report. Now you have to apply the installed template. For this you have to click on Extension>Template manager from the drop down menu. So that, you will see all the templates.
Click on the radio button of the newly installed template and click on default, which is placed on the upper right corner of the page. Now open a new tab and type, localhost/technotoons. Then press enter. You will see that, your template has been changed.
Download PDF http://www.ziddu.com/download/18592510/joomla-5.pdf.html

Website development with JOOMLA: part 4


Hey guyzz….this is the 4th part of our tutorial about developing website with joomla. Whom did you miss the last episodes, can check out here-
In this part, we are going to download extension and template. These will be needed on the next part of our tutorial. Download from the following link-


These are .rar files. After the download is completed, extract these and save the template and extension on different folders. Delete the main files. When you will extract the rar files, you will find some zip files. Keep them on their folder without making them unzip.
That is all for today. On our next episode, we will discuss about adding template and extension, modify and develop them.
Please give your wise opinion and let us know if this tutorial is helping you or not. Have a good day….

The complete CSS tutorial for beginners- part 2


Friends..again we came with the tutorial about CSS. This is the 2nd part of this tutorial. On this part we will disclose about class selector & ID selector. You can also catch the 1st part of this tutorial here.

Class selector

Class selector is one of the technique to specify any part or one or more components of web page of CSS. Multiple items can be identified by one class Selector, that’s how it helps to reduce the amount of coding.
Like- CSS code for <p class="mar"> 24 / 7 Support</p> is-
.mar{color: #C03;
font-size:36px}
Here class key-word is used in HTML tag to point out class selector. Then it needs putting a “=”sign there & enclosing the class name in double quotes. Like- <p class="mar">. Here “mar” is the class name. Dot sign (.) is used to point out class on style sheet.
Next we are going to discuss about ID selector.

ID selector:

ID selector is a popular way of CSS to specify any part or or content of a web page. But you cannot identify multiple contents by a single ID selector like class selector.
Like- <p id="post1"> We are bangladeshi Hostgator hosting provider. The world wide technical and support team is working for your best movement.  information. 
Like- CSS code for </p> is-
#post1{color:#066;
font-family:Tahoma;
text-align:justify;}
ID key-word is used to indicate on HTML tag. Then it needs putting a “=”sign there & enclosing the class name in double quotes. Like- <p id="post1">. Here the ID name is post1. (#) sign is used to point out ID on style sheet.
Thank you all.

Website development with JOOMLA: part 3


Hello friends…how are you all? On the last two tutorials, we have discussed about the basic information of joomla and the installation process of xampp and joomla. After the last two parts, we are able to display the default screen of joomla. Those who missed the last two parts, can check out here-
Today we will learn to remove the unnecessary information from the website and add that information which is concerned with the website. At first, start the apache and mysql.
Now open a browser and type localhost/technotoons /administrator on the address bar. Press enter and you will see the following figure.
On the box of username, type admin. And on the box of password, type 123456 and click on login. You will see like the following figure.
This is your control panel. You can edit/delete any information of joomla site and add the information of your own site. For your convenience, type localhost/technotoons on the address bar and keep open joomla site. Now choose other tab on the same browser. Type localhost/technotoons /administrator on the address bar. In the required box, give the user name and password and open the control panel. Have a look on the following figure of the 1st tab.
This is called the top menu. There are four types of menu such as, About joomla, features, News, The community. At first, we have to add a new menu with the remaining. Let we will creat a menu named turjo. For this, click on the Article manager from the 2nd tab.
You will see like the above figure.
Click on the button named new, which is on the upper right corner of the page. So that, you will see the above figure.
Type turjo on the title box and on the alias. Select the Uncategorized section. Click yes on the published menu. Click no on the front-page menu. Select Uncategorized on the category. Now type Turjo is my best friend. We live in Khulna, on the text box given below. Click on the save button. After that, select the top menu. A window will appear. On the upper right side of the window, you will see the button named new. Click on that. You will see the following figure.
Click on the article. The following figure will appear.
Click on the article layout. You will see like following.
Type turjo on the title box and on the alias. On the right side, you will see the option, Parameters (Basic). Click on the option, select article. Then you will see the following window.
Click on turjo and save it. Now refresh the first tab, and you will see the menu named turjo on the top menu.
Now click on turjo and you will see the description what was written before.
You can add extra menu to the top menu by the above procedure. We will discuss about the section and category on our next tutorial, stay with us. Good-bye.
Download PDF http://www.ziddu.com/download/18529752/Joomla-3.pdf.html